まえがき
前回の記事までの準備が整ったところで、実際に model.kmodel を作成する手順について説明する。この記事では、MobileNet.v1 を用いた転移学習により作成したモデルをもとに kmodel 形式のファイルを生成するところまでを紹介する。
以下のサイトを参考に記事を作成した。元記事は Google Colab を使っているが、Windows 10 上の Jupyter Notebook を用いるように修正している。
データの準備
画像データは前々回の記事で用意した k210 フォルダ内に用意する。images フォルダの中にフォルダごとに画像ファイルを分類して入れておくものとする。例えばフォルダ構造は以下のような形になる。(以下では、imagesフォルダの下に、salad, sushi, tofu のフォルダを作成し、それぞれに画像ファイルが格納されている)
C:\USERS\EIICHIRO ITO\DOCUMENTS\K210
 ├─.ipynb_checkpoints
 ├─images
 │  ├─salad
 │  ├─sushi
 │  └─tofu
 ├─Maix_Toolbox
 │  ├─images
 │  ├─log
 │  ├─ncc
 │  │  ├─bin
 │  │  └─refs
 │  └─workspace
 └─transfer_learning_sipeed
     ├─images
     │  ├─your_class1
     │  └─your_class2
     ├─mobilenet_sipeed
     │  └─pycache
     ├─mobilenet_v1_transfer_learning
     └─model_labels
Jupyter Notebook の起動
これ以降の作業では miniconda3 でインストールした Jupyter Notebook を利用する。スタートボタンを押して「Anaconda3(64 bit)」から「Jupyter Notebook (k210)」を選んで Jupyter Notebook を起動する。
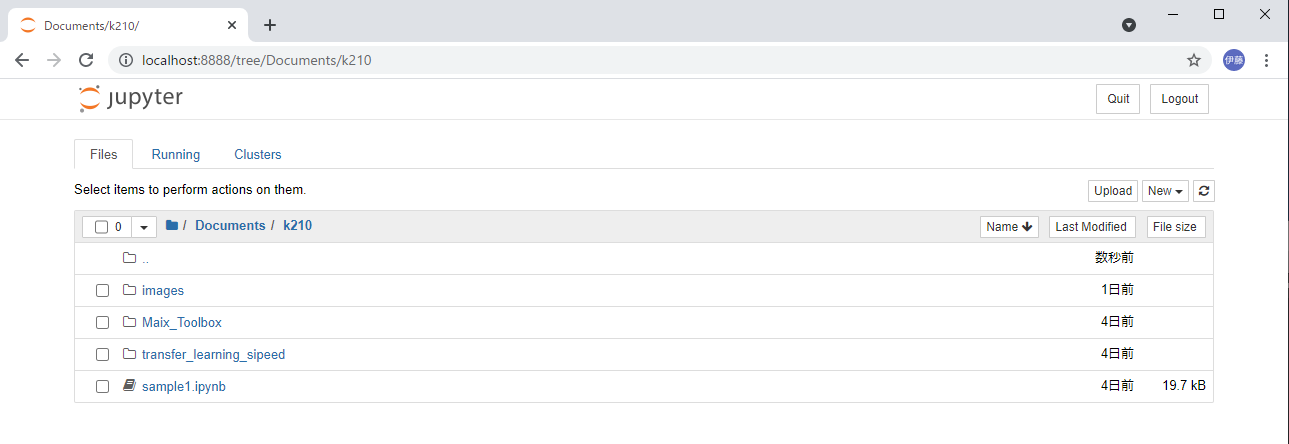
するとウェブブラウザが開いてフォルダ一覧が表示される。Documents をクリックし、さらに k210 をクリックすると以下のような画面になる。(sample1.ipynb はこれから作成するので、まだ存在しない)

右側の「New」というボタンをクリックして「Python 3」という項目を選ぶと、ブラウザの新しいタブに Notebook が表示される。

In [ ] の右にある欄に、以下の内容を入力する。
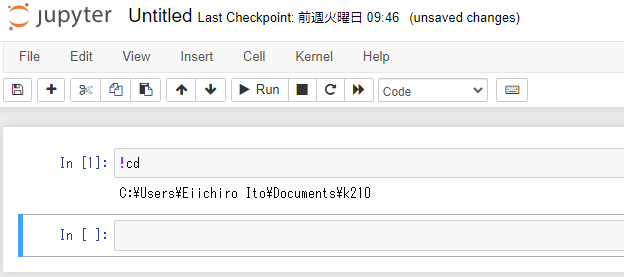
!cd
入力した後で、Shift キーを押しながら Enter キーを押すと、入力した内容が実行され、以下のように結果(作成した Notebook があるフォルダ名)が表示される。(画面上部の Run をクリックしてもよい)
miniconda の環境名が表示されれば OK である。

MobileNet.v1 による転移学習
あとは Windows 10 上であることに気をつけながら、コピペしながら Notebook を動かしていけば良い。まず、各種モジュールをインポートする。
import keras
import numpy as np
from keras import backend as K
from keras.optimizers import Adam
from keras.metrics import categorical_crossentropy
from keras.preprocessing.image import ImageDataGenerator
from keras.preprocessing import image
from keras.models import Model
from keras.applications import imagenet_utils
from keras.layers import Dense, GlobalAveragePooling2D, Dropout
import sys
sys.path.append('./transfer_learning_sipeed')
from mobilenet_sipeed.mobilenet import MobileNet
from keras.applications.mobilenet import preprocess_input
import tensorflow
キモは、後半にあるダウンロード・展開したMobileNet を使う部分である。(import sysからの3行)
続いて MobileNet を使って基本となるモデルを作成する。入力として 224×224 ピクセルの画像を使うようにしている。
IMAGE_SIZE = 224
ALPHA = 0.75
base_model=MobileNet(input_shape=(IMAGE_SIZE, IMAGE_SIZE, 3), alpha = ALPHA, depth_multiplier = 1, dropout = 0.001, include_top = False, weights = "imagenet", classes = 1000, backend=keras.backend, layers=keras.layers,models=keras.models,utils=tensorflow.keras.utils)
最終段を追加してモデルを作成する。
x = base_model.output
x = GlobalAveragePooling2D()(x)
x = Dense(100,activation='relu')(x)
x = Dropout(0.5)(x)
x = Dense(50,activation='relu')(x)
preds = Dense(3,activation='softmax')(x)
model = Model(inputs=base_model.input, outputs=preds)
念の為モデルの全層を表示した後、モデルの基本部分は学習させずに追加した後半の層だけ学習させるように設定する。
for i,layer in enumerate(model.layers):
    print(i,layer.name)
for layer in model.layers[:86]:
    layer.trainable=False
for layer in model.layers[86:]:
    layer.trainable=True
準備したデータを使って転移学習させるように設定する。
train_datagen = ImageDataGenerator(preprocessing_function=preprocess_input)
train_generator = train_datagen.flow_from_directory('./images', target_size=(IMAGE_SIZE,IMAGE_SIZE), color_mode='rgb', batch_size=32, class_mode='categorical', shuffle=True)
以下を実行すると、画像フォルダと分類結果のインデックスとの対応がわかる。
train_generator.class_indices
モデルをコンパイルする。
model.compile(optimizer='Adam',loss='categorical_crossentropy',metrics=['accuracy'])
学習を実行させる。
step_size_train = train_generator.n // train_generator.batch_size
model.fit_generator(generator=train_generator, steps_per_epoch=step_size_train, epochs=10)
学習したモデルを model.h5 ファイルに保存する。
model.save('model.h5')
model.kmodel ファイルに変換する
まずは TensorFlow Lite 形式に変換する。
!tflite_convert --output_file=./model.tflite --keras_model_file=./model.h5
次に kmodel 形式に変換する。
%cd Maix_Toolbox
!ncc\ncc -i tflite -o k210model --dataset ../images ../model.tflite ../model.kmodel
%cd ..
これで出来上がった(はず)である。
!dir
ドライブ C のボリューム ラベルは OS です
  ボリューム シリアル番号は 9A9C-C56D です
 C:\Users\Eiichiro Ito\working のディレクトリ
 2021/06/22  12:15
          .
 2021/06/22  12:15   <DIR>      ..
 2021/06/22  09:46   <DIR>      .ipynb_checkpoints
 2021/06/22  10:49   <DIR>      images
 2021/06/22  09:39   <DIR>      Maix_Toolbox
 2021/06/22  12:08    8,596,944 model.h5
 2021/06/22  12:15    1,964,232 model.kmodel
 2021/06/22  12:09    7,575,316 model.tflite
 2021/06/22  09:44   <DIR>      transfer_learning_sipeed
 2021/06/22  12:10       17,293 Untitled.ipynb
                4 個のファイル          18,153,785 バイト
                6 個のディレクトリ  73,775,235,072 バイトの空き領域
ここまでエラーなしで到達できれば完了となる。